Overview
Most small companies can be provided with a single portal to allow them to purchase the range of products you decide. Sometimes you have larger customers, they may have multiple branches and you may choose to offer different products to different branches. This article covers some ways you can fulfill these goals using the M-Power Client Portal and M-Power Aspire.
How to configure multi-branch portals
The best practice for multi-branch scenarios is to create a separate M-Power Company for each branch. This allows you to group the products, pricing and logins at the branch level and also see their respective Quotes, Orders etc. in WIP grouped under the branch name.
Each branch is managed as per a standalone portal. The users for that branch can only see 'their' Products, Quotes and Orders not those of other branches which reduces confusion.
Branding Multi-Branch Sub Portals
While in most cases branding for your portals would be generic, that is, related to your business not the customer, it is possible to offer customer branding to your customers. This obviously requires additional configuration and management by you.
The elements that can be customised are as follows:
- Header and Footer Images and Content
- Page Colours (custom css)
- Login Page Graphics (note this requires a custom domain to work)
- Login Page Footer Text
Sub Portal Customisation is performed in the Settings > Client Portal section.

Adding Sub Portals
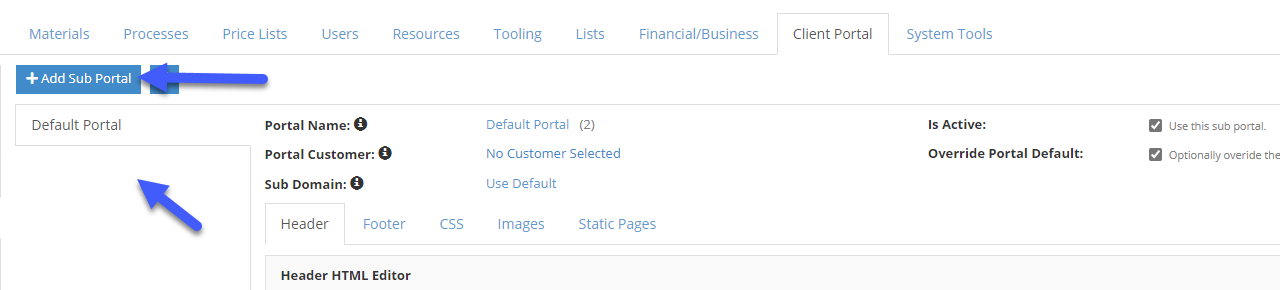
To add a new Sub Portal use the Add Sub Portal Button. Sub Portal will be displayed as tabs below this button allowing selection of individual portals.
Sub Portal Settings

You can edit the core settings for Sub Portal here. The Portal Name used only for Sub Portal Identification, it is not displayed in the Client Portal.
Portal Customer is the custom to which this Sub Portal design should be applied. For multi-branch scenarios you can select the Head Office customer here and any Sub Branches with this company selected as their Head Office will inherit this portal design.
See the section below on custom sub domains.
Use the is-active setting to make the portal active or remove it from service without deleting it.
A single portal can override the default look and feel of the client portal. We recommend you name this Sub Portal 'Default'. Tick the Override option to apply this design to any portals that do not have a specific or inherited portal. Note that ticking this option will remove the Portal Customer selection if selected as the default override cannot be applied to a single customer.
Sub Portal Inheritance
When a sub-portal customer is selected, this sub-portal is applied when any user from that company is logged in. To make management of large company portals with many branches easier the sub-portals also obey inheritance at the company level. For instance, you can specify Company A Head Office as the sub-portal customer. Then for all the company profiles for the branches of this company set the Head Office Company setting to Company A Head Office. The sub-portal will be applied automatically to all child companies without the need to specify a sub-portal in each.
Header and Footer HTML Blocks
Use the Header and Footer HTML blocks to add layout and css properties. You can use a style block in the header section to accomplish most customisation options. Examples of various elements that can be overridden are shown below.
.custom-navbar{
    {% comment %} -- Main Navigation Bar Background -- {% end comment %}
    background-color: #000 !important;
}
.custom-navbar .custom-nav .active a {
    {% comment %} -- Active Navigation Button -- {% end comment %}
    color: #006338 !important;
}
.custom-navbar .custom-nav li a :hover {
    {% comment %} -- Navigation Button Hover -- {% end comment %}
    color: #006338 !important;
}
.media-body h3 {
    {% comment %} --  -- {% end comment %}
    color: #006338
}
#quoteTable tr th {
    {% comment %} -- Quote Table Header Colour -- {% end comment %}
    background-color: #006338;
}
.for-minheight .col-md-12 {
    {% comment %} -- Quote Table Borders -- {% end comment %}
    border: 1px solid #006338;
}
#orderTable_wrapper .table th {
    {% comment %} -- Order Table Header Background -- {% end comment %}
    background-color: #006338;
}
.order-table .col-md-12 {
    {% comment %} -- Order Table Borders -- {% end comment %}
    border-color: #006338!important;
}
body {
    {% comment %} -- Body Background Colour -- {% end comment %}
    background-color: #fff !Important;
}
Uploading Images
The primary method to change the look and feel of a sub portal is using Header and Footer images. Upload images in the Images tab, you can reference them in the Header and Footer HTML Overrides. There are two images for both header and footer, this allows having a primary image and optional repeating background if required by the logo design.
You can reference uploaded header and footer images using the placeholders __HEADER_IMAGE__, __HEADER_IMAGE_2__, __FOOTER_IMAGE__ and __FOOTER_IMAGE_2__. Once this HTML is saved these placeholders are replaced with the correct image paths for your Instance and Sub Portal.
An example of HTML using a repeating header background image and showing use of placeholders is shown below:
<style type="text/css">
    .header_banner {
        width: 100%;
        text-align: center;
        background-image: url("__HEADER_IMAGE_2__");
        background-repeat: repeat-x;
        background-size: contain;
    }
    .header_banner img {
        max-height: 90px;
    }
    body {
        background-color: #fff !Important;
    }
    .body-content {
        padding-left: 0px;
        padding-right: 0px;
    }
</style>
<div class="header_banner">
    <img alt="My Company" src="__HEADER_IMAGE__">
</div>
Custom CSS
Typically you would apply any custom CSS in Header HTML Section but in cases where additional CSS is required, you can add in this section.
Custom Sub Domains
If you need to show different Login Page Content/Logo for a Sub Portal then a custom sub domain is required. Note that configuration of sub domains requires custom configuration and an additional charge.
Managing Products in multi-branch scenarios
Often in multi-branch scenarios you want provide a grouped set of products to all branches. Please see the article on bulk operations for managing products.
Comments
0 comments
Article is closed for comments.